
Getting Started | Building an Application with Ionic
In this part 2 of note application we will buid an application with Ionic framewotk
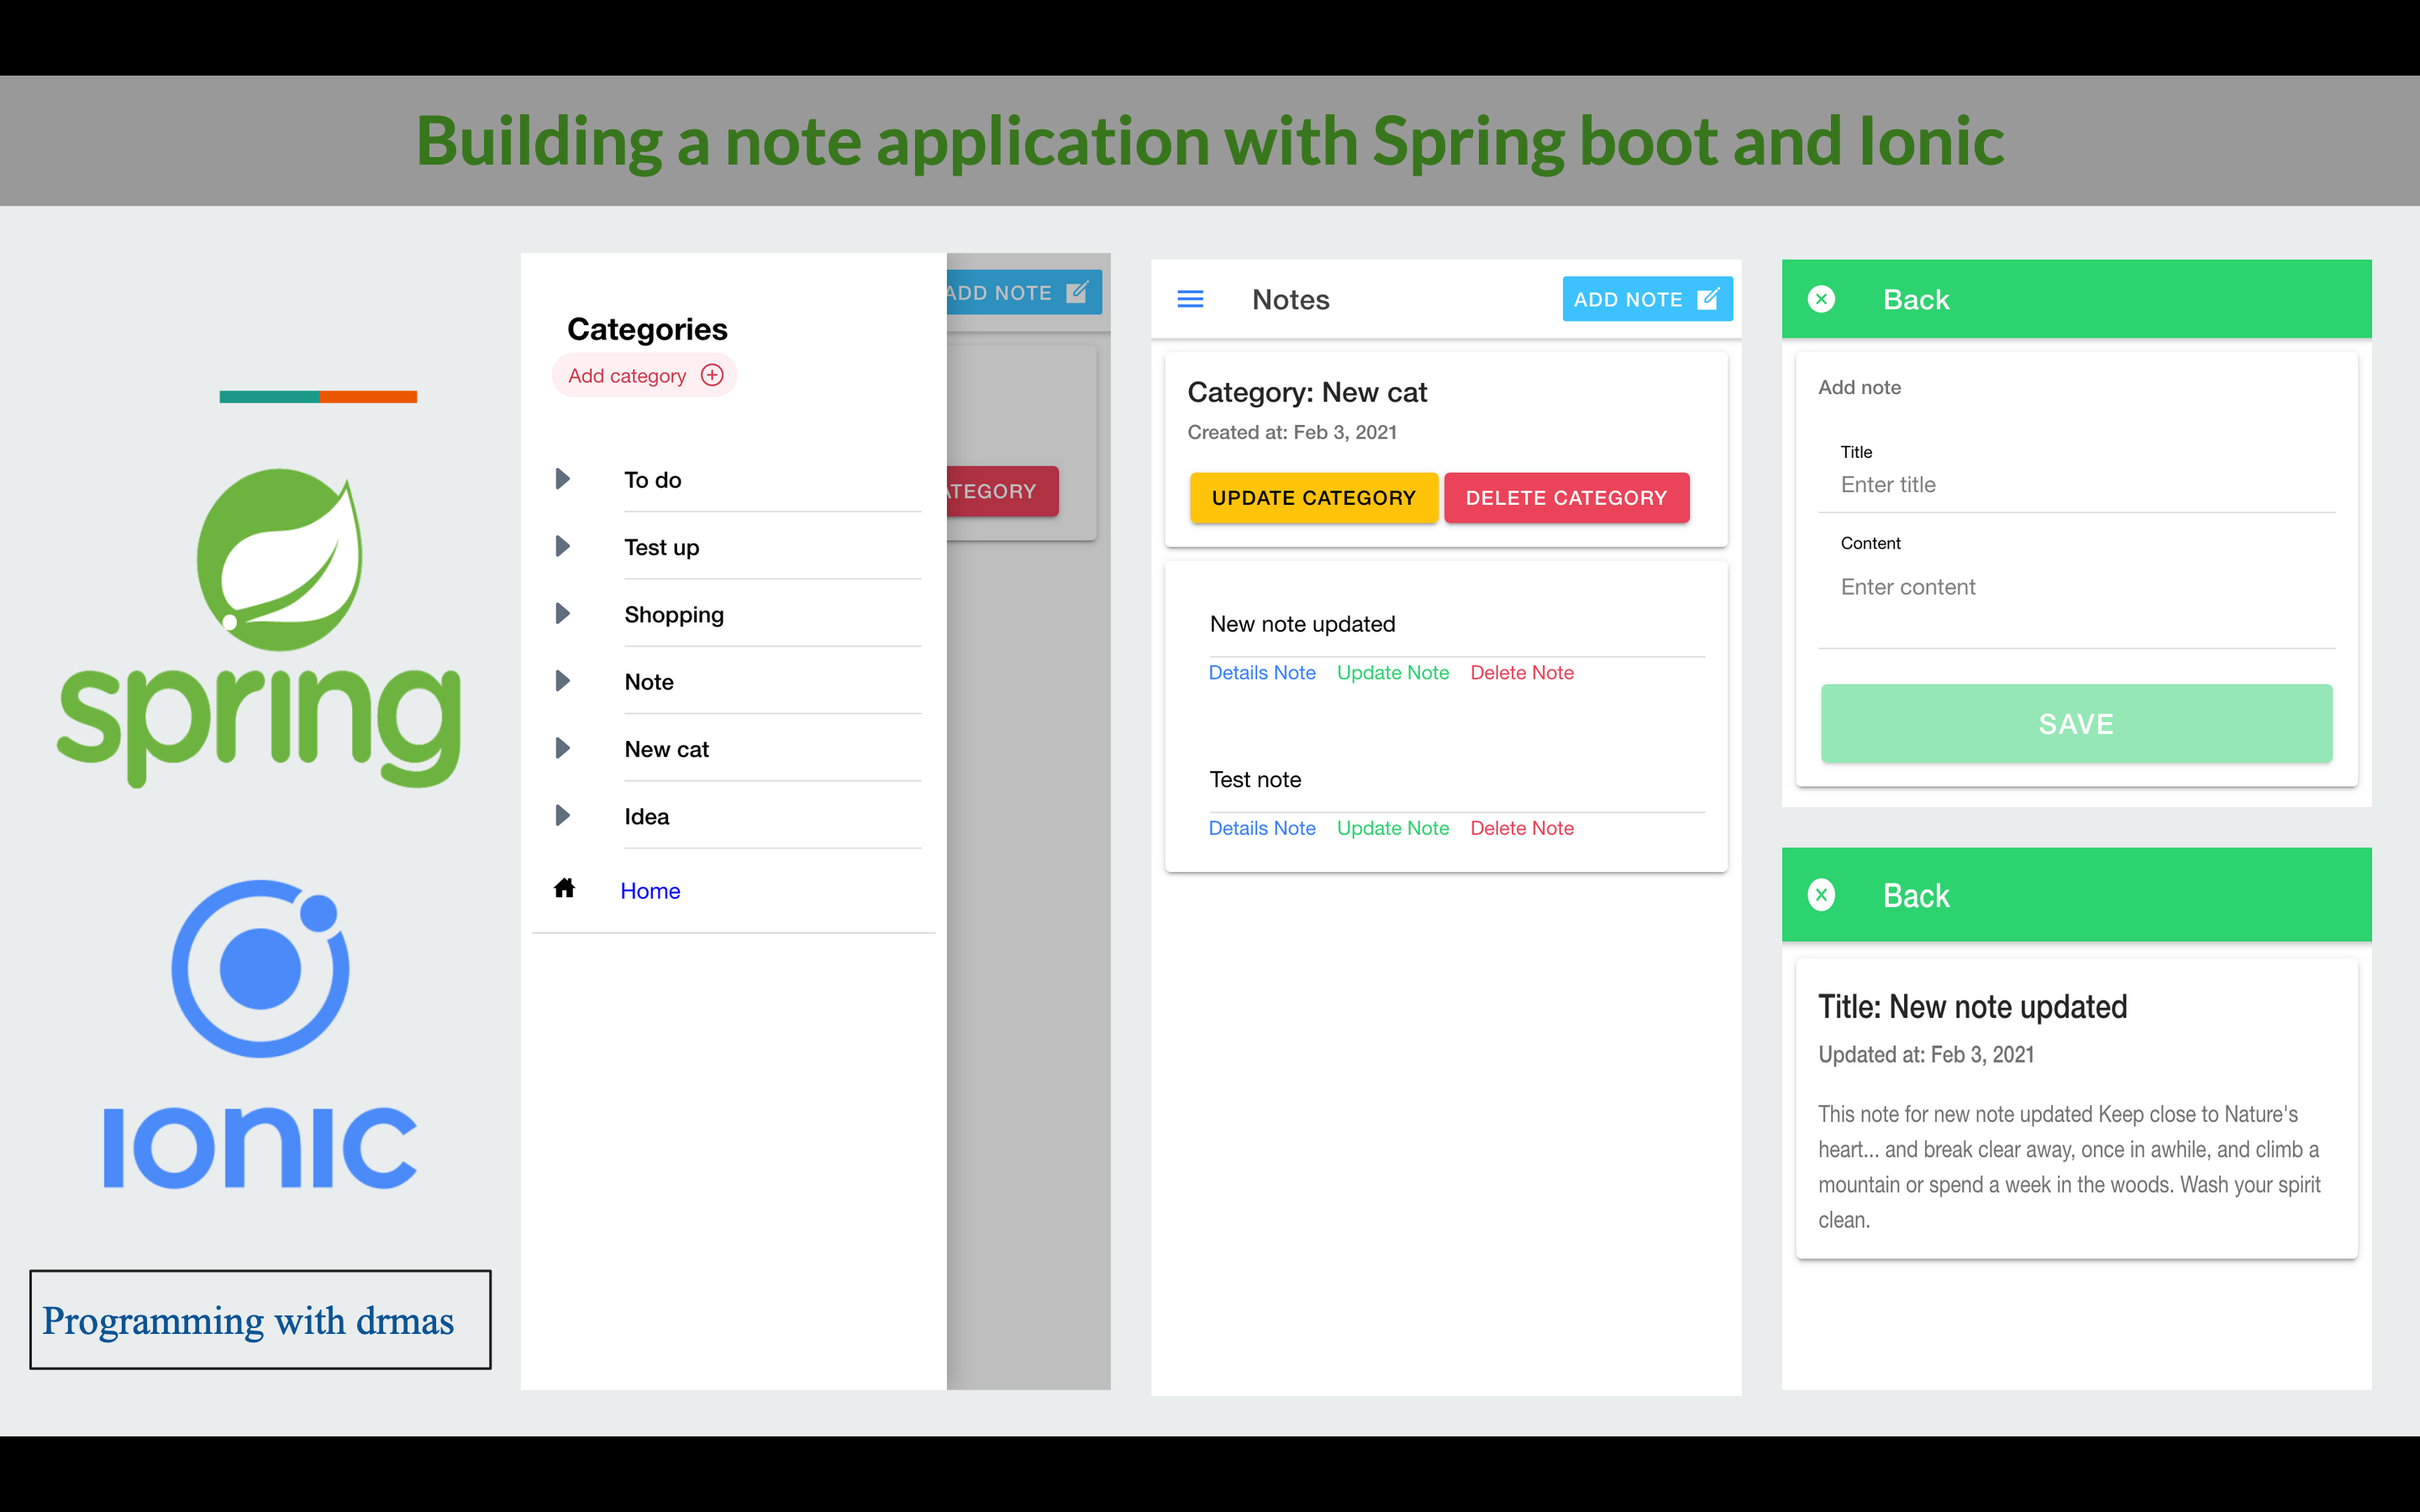
In this tutorial we will create an application note to do or create your idea by category the note conent a title, create at, update at end content a description, We ere going use Spring boot for banckend and Ionic Angular for Frontend.
Ionic apps are created and developed primarily through the Ionic command line utility (the “CLI”), and use Cordova to build/deploy as a native app. This means we need to install a few utilities to get developing.
Installing Ionic
Ionic apps are created and developed primarily through the Ionic command-line utility. The Ionic CLI is the preferred method of installation, as it offers a wide range of dev tools and help options along the way. It is also the main tool through which to run the app and connect it to other services, such as Ionic Appflow.
Before proceeding, make sure your computer has Node.js installed.
Install the Ionic CLI with npm:
$ npm install -g @ionic/cli
Starting an App
Starting a new Ionic app is incredibly simple. From the command line, run the ionic start command and the CLI will handle the rest.
Here, myApp is the name of the project, blank is the starter template, and the project type is angular.
$ ionic start note side-menu
Project structure
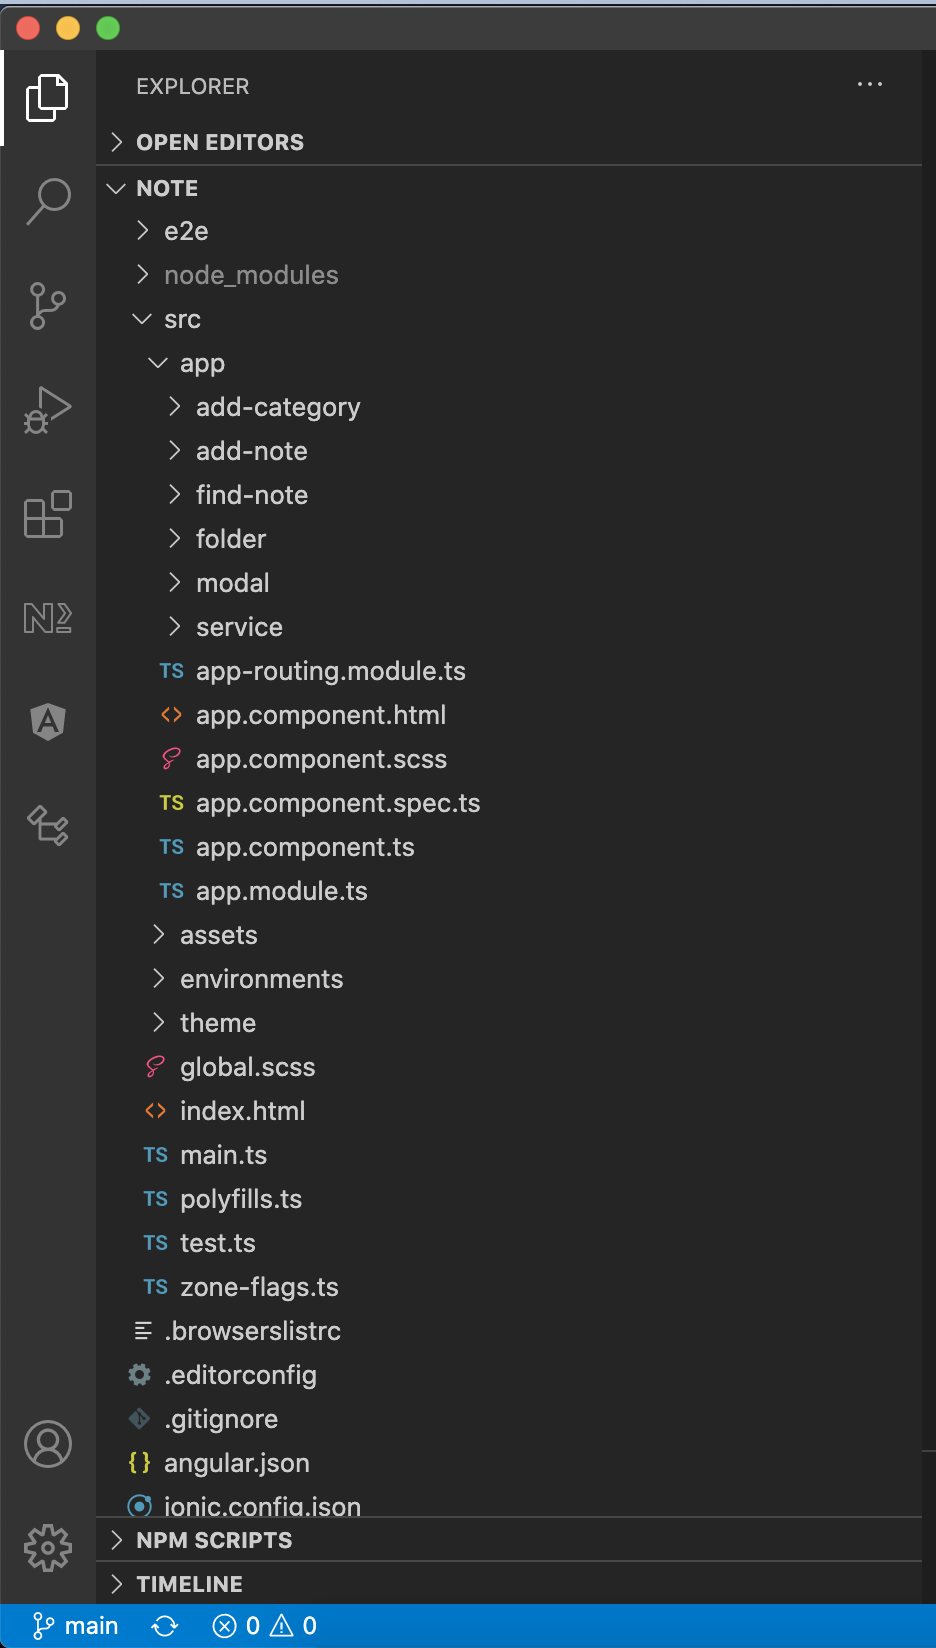
Let's go through the files and folders of the app.
/ src
Inside of the /src directory we find our raw, uncompiled code. This is where most of the work for your Ionic app will take place.
/ app
The App folder is the largest folder because it contains all the code of our ionic app. It has all the components, modules, pages, services and styles you will use to build your app.
This is the core of the project. Let’s have a look at the structure of this folder so you get an idea where to find things and where to add your own modules to adapt this project to your particular needs.
Modals
Create a folder modal in side it add a class Model.ts
src/app/modal/Modal.ts
export interface Category {
id: number;
name: string;
createAt: any;
updateAt: any;
notes: Note[];
}
export interface Note {
id: number;
title: string;
content: string;
createAt: any;
updateAt: any;
}
Angular Services
Angular services are singleton objects that get instantiated only once during the lifetime of an application. They contain methods that maintain data throughout the life of an application, i.e. data does not get refreshed and is available all the time. The main objective of a service is to organize and share business logic, models, or data and functions with different components of an Angular application.
An example of when to use services would be to transfer data from one controller to another custom service.
Why Should We Use Services in Angular? The separation of concerns is the main reason why Angular services came into existence. An Angular service is a stateless object and provides some very useful functions. These functions can be invoked from any component of Angular, like Controllers, Directives, etc. This helps in dividing the web application into small, different logical units which can be reused.
Create these service in the service package
-> CategoryService-> NoteService
src/app/service/category-service.ts
import { HttpClient } from '@angular/common/http';
import { Injectable} from '@angular/core';
import { Observable} from 'rxjs';
import { Category} from '../modal/Modal';
@Injectable({
providedIn: 'root',
})
export class CategoryService {
constructor(private http: HttpClient) { }
addCategory(category: Category): Observable<any> {
return this.http.post<any>(
`http://localhost:8080/api/addCategory`,
category
);
}
editCategory(category: Category, id: number): Observable<any{
return this.http.put<any>(
`http://localhost:8080/api/editCategory/${id}`,
category
);
}
deleteCategory(id: number): Observable<any> {
return this.http.delete<any>(
`http://localhost:8080/api/deleteCategory/${id}`
);
}
findCategory(id: number): Observable<any> {
return this.http.get<any>(
`http://localhost:8080/api/findCategory/${id}`
);
}
findCategories(): Observable<any[]> {
return this.http.get<any[]>(
`http://localhost:8080/api/findCategories`);
}
}
src/app/service/note-service.ts
import { HttpClient } from '@angular/common/http';
import { Injectable} from '@angular/core';
import { Observable} from 'rxjs';
import { Note} from '../modal/Modal';
@Injectable({
providedIn: 'root',
})
export class NoteService {
constructor(private http: HttpClient) { }
addNote(note: Note, id: number): Observable<any> {
return this.http.post<any>(
`http://localhost:8080/api/addNote/${id}`,
note
);
}
editNote(note: Note, id: number): Observable<any>{
return this.http.put<any>(
`http://localhost:8080/api/editNote/${id}`,
note
);
}
deleteNote(id: number): Observable<any> {
return this.http.delete<any>(
`http://localhost:8080/api/deleteNote/${id}`
);
}
findNote(id: number): Observable<any> {
return this.http.get<any>(
`http://localhost:8080/api/findNote/${id}`
);
}
}
Create pages
Now we'll continue with the project by adding pages which are the basic buildings of an Ionic app. So let's get started. You can create pages either manually or generating them using the Ionic CLI v5 which is the recommended method. In this guide we'll look first at how to create a page generate it with the Ionic CLI, then how to add it to the project.
-> loginWe will use these components
- app.component.ts- app.component.html
$ This component created by default
src/app/app.component.ts
import { Component, OnInit} from '@angular/core';
import { ModalController} from '@ionic/angular'';
import { Category} from '../model/Model';
import { CategoryService} from '../service/category.service';
import { AddCategoryPage} from './add-category/add-category.page';
@Component({
selector: 'app-root',
templateUrl: 'app.component.html',
styleUrls: ['app.component.scss']
})
export class AppComponent implements OnInit {
categories: Category[];
constructor(private categoryService: CategoryService, private modalController: ModalController) {}
ngOnInit(): void {
this.categoryService.findCategories().subscribe(categories => {
this.categories = categories;
})
}
async addCategory() {
const modal = await this.modalController.create({
component: AddCategoryPage,
swipeToClose: true
});
return await modal.present();
}
}
src/app/app.component.html
<ion-app>
<ion-split-pane contentId="main-content">
<ion-menu contentId="main-content" type="overlay">
<ion-content>
<ion-list id="inbox-list">
<ion-list-header style="margin-left: 15px;">Categories</ion-list-header>
<ion-note><ion-chip color="danger" (click)="addCategory()"><ion-label>Add category</ion-label><ion-icon name="add-circle-outline"></ion-icon></ion-chip>
</ion-note>
<ion-menu-toggle auto-hide="false" *ngFor="let cat of categories">
<ion-item button [routerLink]="['/folder/', cat.id]" routerLinkActive="router-link-active">
<ion-icon slot="start" name="caret-forward-outline"></ion-icon>
<ion-label>{{cat.name}}</ion-label>
</ion-item>
</ion-menu-toggle><br>
<ion-label style="margin-left: 15px;" [routerLink]="['/folder/note']">
<ion-icon name="home-sharp"></ion-icon> <span style="margin-left: 32px; color: blue; cursor: pointer">Home</span>
</ion-label>
</ion-list>
</ion-content>
</ion-menu>
<ion-router-outlet id="main-content"></ion-router-outlet>
</ion-split-pane>
</ion-app>
We will use these components
- app.component.ts- app.component.html
$ This component created by default when we created a side-menu
src/app/folder.ts
import { Component, OnInit} from '@angular/core';
import { ModalController} from '@ionic/angular'';
import { Category} from '../model/Model';
import { CategoryService} from '../service/category.service';
import { ActivatedRoute} from '@angular/router';
import { AddCategoryPage} from '../add-category/add-category.page';
import { AddNotePage} from '../add-note/add-note.page';
import { FindNotePage} from '../find-note/find-note.page';
import { NoteService} from '../service/note.service';
@Component({
selector: 'app-folder',
templateUrl: './folder.page.html',
styleUrls: ['./folder.page.scss']
})
export class FolderPage implements OnInit {
showMessage = false;
category: Category = {} as Category;
id: number;
constructor(private categoryService: CategoryService, private modalController: ModalController, private activatedRoute: ActivatedRoute, private noteService: NoteService) {}
ngOnInit() {
this.id = this.activatedRoute.snapshot.params.id;
if(this.id!=null)
this.categpryService.findCategory(this.id).subscribe(category => {
this.category = category;
if(this.category!=null) {
this.showMessage = true;
}
});
async editCategory(id) {
const modal = await this.modalController.create({
component: AddCategoryPage,
swipeToClose: true,
componentProps: {id}
});
return await modal.present();
}
deleteCategory(id) {
if(confirm('Are you sure you want to delete this category')) {
this.categpryService.deleteCategory( id).subscribe(() => {
window.location.reload();
})
}
}
async addNote(idCategory) {
const modal = await this.modalController.create({
component: AddNotePage,
swipeToClose: true,
componentProps: {idCategory}
});
return await modal.present();
}
async editNote(idNote) {
const modal = await this.modalController.create({
component: AddNotePage,
swipeToClose: true,
componentProps: {idNote}
});
return await modal.present();
}
deleteNote(id) {
if(confirm('Are you sure you want to delete this note')) {
this.noteService.deleteNote( id).subscribe(() => {
window.location.reload();
})
}
}
async findNote(id) {
const modal = await this.modalController.create({
component: FindNotePage,
swipeToClose: true,
componentProps: {id}
});
return await modal.present();
}
}
src/app/folder.html
<ion-header [translucent]="true">
<ion-toolbar>
<ion-buttons slot="start" color="success">
<ion-menu-button></ion-menu-button>
</ion-buttons>
<ion-title>Notes</ion-title>
<ion-buttons slot="primary" (click)="addNote(category.id)">
<ion-button fill="solid" color="secondary">
Add note
<ion-icon slot="end" name="create-sharp"></ion-icon>
</ion-button>
</ion-buttons>
</ion-toolbar>
</ion-header>
<ion-content [fullscreen]="true">
<ion-card *ngIf="showMessage">
<ion-card-header>
<ion-card-title>Category: {{category.name}}</ion-card-title>
<ion-card-subtitle *ngIf="category.createAt">Created at: {{category.createAt | date}}</ion-card-subtitle>
<ion-card-subtitle *ngIf="category.updateAt">Updated at: {{category.updateAt | date}}</ion-card-subtitle>
</ion-card-header>
<ion-card-content>
<ion-button color="warning" (click)="editCategory(category.id)">Update category</ion-button>
<ion-button color="danger" (click)="deleteCategory(category.id)">Delete category</ion-button>
</ion-card-content>
</ion-card>
<ion-card *ngIf="showMessage">
<ion-card-content *ngFor="let note of category.notes">
<ion-list>
<ion-item>
{{note.title}}
</ion-item>
<ion-note color="primary" style="margin-left: 15px; cursor: pointer;" (click)="findNote(note.id)">Details Note</ion-note>
<ion-note color="success" style="margin: 0 15px; cursor: pointer;" (click)="editNote(note.id)">Update Note</ion-note>
<ion-note color="danger" style="cursor: pointer;" (click)="deleteNote(note.id)">Delete Note</ion-note>
</ion-list>
</ion-card-content>
</ion-card>
<ion-card *ngIf="!showMessage">
<ion-card-content>
<img src="https://zupimages.net/up/21/05/p3c7.png" alt="">
</ion-card-content>
</ion-card>
</ion-content>
Go ahead and open your terminal or command prompt and follow the instructions:
$ ng generate page add-category
We will use these components
- add-category.page.ts- add-category.page.html
Go ahead and open your terminal or command prompt and follow the instructions:
src/app/add-category.page.ts
import { Component, OnInit} from '@angular/core';
import { ModalController} from '@ionic/angular'';
import { Category} from '../model/Model';
import { CategoryService} from '../service/category.service';
@Component({
selector: 'app-category',
templateUrl: './add-category.page.html',
styleUrls: ['./add-category.page.scss']
})
export class AddCategoryPage implements OnInit {
progressBar = false;
category: Category = {} as Category;
id: number;
constructor(private categoryService: CategoryService, private modalController: ModalController) {}
ngOnInit() {
if (this.id != null) {
this. categoryService.findCategory(this.id).subscribe((category) => {
this.category = category;
});
}
}
cancel() {
this. modalController.dismiss>();
}
addCategory() {
this.showProgressBar = true;
if (this.id != null) {
this. categoryService
.editCategory(this.category:, this.id)
.subscribe((category) => {
this.category = category:;
window.location.reload();
});
} else {
this. categoryService.addCategory(this.category).subscribe((category) => {
this.category: = category;
window.location.reload();
});
}
}
}
src/app/add-category.html
<ion-header>
<ion-toolbar color="success">
<ion-buttons slot="start">
<ion-button (click)="cancel()">
<ion-icon slot="icon-only" name="close-circle"></ion-icon>
</ion-button>
</ion-buttons>
<ion-title>Back</ion-title>
</ion-toolbar>
</ion-header>
<ion-content>
<ion-card>
<ion-spinner name="bubbles" color="primary" class="center" *ngIf="progressBar"></ion-spinner>
<ion-card-header>
<ion-card-subtitle>Add category</ion-card-subtitle>
</ion-card-header>
<ion-card-content>
<form name="client" (ngSubmit)="addCategory()" #formRegister="ngForm" novalidate>
<ion-item>
<ion-label position="floating">Name</ion-label>
<ion-input type="text" placeholder="Enter name" name="name" [(ngModel)]="category.name" #name="ngModel" required></ion-input>
</ion-item><br>
<ion-button type="submit" color="success" fill="solid" size="large" expand="block" [disabled]="name.invalid">Save</ion-button>
</form>
</ion-card-content>
</ion-card>
</ion-content>
Go ahead and open your terminal or command prompt and follow the instructions:
$ ng generate page add-note
We will use these components
- add-note.page.ts- add-note.page.html
src/app/add-note.ts
import { Component, OnInit} from '@angular/core';
import { ModalController} from '@ionic/angular'';
import { Note} from '../model/Model';
import { NoteService} from '../service/note.service';
@Component({
selector: 'app-add-note',
templateUrl: './add-note.page.html',
styleUrls: ['./add-note.page.scss']
})
export class AddNotePage implements OnInit {
progressBar = false;
note: Note = {} as Note;
idCategory: number;
idNote: number;
constructor(private noteService: NoteService, private modalController: ModalController) {}
ngOnInit() {
if(this.idNote != null) {
this.noteService.findNote(this.idNote).subscribe(note => {
this.note = note;
})
}
}
addNote() {
this.showProgressBar = true;
if(this.idNote != null) {
this.noteService.editNote(this.note, this.idNote).subscribe(note => {
this.note = note;
window.location.reload();
})
}
if(this.idCategory!=null) {
this.noteService.addNote(this.note, this.idCategory).subscribe(note => {
this.note = note;
window.location.reload();
})
}
cancel() {
this.modalController.dismiss>();
}
}
src/app/add-note.html
<ion-header>
<ion-toolbar color="success">
<ion-buttons slot="start">
<ion-button (click)="cancel()">
<ion-icon slot="icon-only" name="close-circle"></ion-icon>
</ion-button>
</ion-buttons>
<ion-title>Back</ion-title>
</ion-toolbar>
</ion-header>
<ion-content>
<ion-card>
<ion-spinner name="bubbles" color="primary" class="center" *ngIf="progressBar"></ion-spinner>
<ion-card-header>
<ion-card-subtitle>Add note</ion-card-subtitle>
</ion-card-header>
<ion-card-content>
<form name="client" (ngSubmit)="addNote()" #formRegister="ngForm" novalidate>
<ion-item>
<ion-label position="floating">Title</ion-label>
<ion-input type="text" placeholder="Enter title" name="title" [(ngModel)]="note.title" #title="ngModel" required></ion-input>
<ion-item>
<ion-label position="floating">content</ion-label>
<ion-textarea type="text" placeholder="Enter content" name="content" [(ngModel)]="note.content"
#content="ngModel" required></ion-textarea>
</ion-item>
</ion-item><br>
<ion-button type="submit" color="success" fill="solid" size="large" expand="block" [disabled]="title.invalid">Save</ion-button>
</form>
</ion-card-content>
</ion-card>
</ion-content>
Go ahead and open your terminal or command prompt and follow the instructions:
$ ng generate page find-note
We will use these components
- find-note.page.ts- find-note.page.html
src/app/find-note.ts
import { Component, OnInit} from '@angular/core';
import { ModalController} from '@ionic/angular'';
import { Note} from '../model/Model';
import { NoteService} from '../service/note.service';
@Component({
selector: 'app-note',
templateUrl: './find-note.page.html',
styleUrls: ['./find-note.page.scss']
})
export class AddNotePage implements OnInit {
note: Note = {} as Note;
id: number;
constructor(private noteService: NoteService, private modalController: ModalController) {}
ngOnInit() {
this.noteService.findNote(this.id).subscribe(note => {
this.note = note;
})
}
cancel() {
this.modalController.dismiss>();
}
}
src/app/find-note.html
<ion-header>
<ion-toolbar color="success">
<ion-buttons slot="start">
<ion-button (click)="cancel()">
<ion-icon slot="icon-only" name="close-circle"></ion-icon>
</ion-button>
</ion-buttons>
<ion-title>Back</ion-title>
</ion-toolbar>
</ion-header>
<ion-content>
<ion-card>
<ion-card-header>
<ion-card-title>Title: {{note.title}}</ion-card-title>
<ion-card-subtitle *ngIf="note.createAt">Created at: {{note.createAt |date}}</ ion-card-subtitle>
<ion-card-subtitle *ngIf="note.updateAt">Updated at: {{note.updateAt |date}}</ion-card-subtitle>
</ion-card-header>
<ion-card-content>
{{note.content}}
</ion-card-content>
</ion-card>
</ion-content>
Add the AppRoutingModule
In Angular, the best practice is to load and configure the router in a separate, top-level module that is dedicated to routing and imported by the root AppModule.
By convention, the module class name is AppRoutingModule and it belongs in the app-routing.module.ts in the src/app folder.
app-routing-module.ts
src/app/app-routing.module.ts
import { NgModule } from '@angular/core';
import { PreloadAllModules, RouterModule, Routes } from '@angular/router';
const routes: Routes = [
{
path: '',
redirectTo: 'folder/note',
pathMatch: 'full'
},
{
path: 'folder/:id',
loadChildren: () => import ('./folder/folder.module').then( m => m.FolderPageModule)
},
{
path: 'add-category'),
loadChildren: () => import ('./add-category/add-category.module').then( m => m.AddCategoryPageModule)
},
{
path: 'find-note'),
loadChildren: () => import ('./find-note/find-note.module').then( m => m.FindNotePageModule)
},
{
path: 'add-note'),
loadChildren: () => import ('./add-note/add-note.module').then( m => m.AddNotePageModule)
},
];
@NgModule({
imports: [
RouterModule.forRoot(routes, { preloadingStrategy: PreloadAllModules })
],
exports: [RouterModule]
})
export class AppRoutingModule { }
NgModules and JavaScript modules
The NgModule system is different from and unrelated to the JavaScript (ES2015) module system for managing collections of JavaScript objects. These are complementary module systems that you can use together to write your apps.
In JavaScript each file is a module and all objects defined in the file belong to that module. The module declares some objects to be public by marking them with the export key word. Other JavaScript modules use import statements to access public objects from other modules.
app-module.ts
src/app/app-module.ts
import { CUSTOM_ELEMENTS_SCHEMA, NgModule, NO_ERRORS_SCHEMA } from '@angular/core';
import { BrowserModule } from '@angular/platform-browser';
import { RouteReuseStrategy } from '@angular/router';
import { IonicModule, IonicRouteStrategy } from '@ionic/angular';
import { SplashScreen } from '@ionic-native/splash-screen/ngx';
import { StatusBar } from '@ionic-native/status-bar/ngx';
import { HttpClientModule } from '@angular/common/http';
import { AppComponent } from './app.component';
import { AppRoutingModule } from './app-routing.module';
import { FormsModule } from '@angular/forms';
@NgModule({
declarations: [AppComponent],
entryComponents: [],
imports: [
BrowserModule,
IonicModule.forRoot(),
AppRoutingModule,
FormsModule,
HttpClientModule,
],
providers: [
StatusBar,
SplashScreen,
{ provide: RouteReuseStrategy, useClass: IonicRouteStrategy }
],
schemas: [
CUSTOM_ELEMENTS_SCHEMA,
NO_ERRORS_SCHEMA
],
bootstrap: [AppComponent]
})
export class AppModule { }
Conclusion
Now we have an overview of Spring Boot CRUD example when building a CRUD App.
We also take a look at client-server architecture for REST API using Spring Web MVC & Spring Data JPA, as well, we ware creating an Ionic app with Angular 10 project structure for building a front-end app to make HTTP requests and consume responses.


0 Comments